3D Printing Electrical Enclosures
- May 9, 2018
- 4 min read
3D Printing is an ideal means of manufacturing custom electrical enclosures.
We have worked with many industrial clients that have utilized our large format 3D printing capacity to produce electrical enclosures. The reason they prefer 3D printing is to traditional machining is primarily based on cost.
The additive nature of 3D printing reduces the amount of material needed to create an enclosure when compared to subtractive machining. After all a delrin block is far more expensive than a kilogram of ABS. Injection molding is not an option because with larger enclosures, greater than 12 inches cubed, the cost of the mold is very prohibitive. Not to mention the time to have just 10-20 enclosures produced is too long. But 3D printing can produce the pieces in 1-2 weeks.
But as is the problem with most items submitted for 3D printing, the engineer of the enclosure does not design for 3D printing. They take a traditional enclosure and expect 3D printing to create a result that is identical to other processes. It will not be. So we wanted to compile some tips for designing electrical enclosures.


Design a Foundation Layer
When printing any part a decision must be made about what side of the part will be against the print bed. Traditionally this will be the largest single flat surface. This is used to have maximum bed adhesion which limits warping and failure of parts. Generally this side is the back or bottom of the enclosure that might be mounted against a wall. Ideally this side should have no complex features such as text. Just holes. If there is text, they it can become unreadable as the first layer is often "squashed" in order to help with adhesion. When designing your enclosure try to create a large simple side which can serve as the foundation

If all side of an enclosure require critical details there are multiple solutions.
Consider using sticker for denotations instead of embossed or engraved details
Request that the part be printed with the open face down.
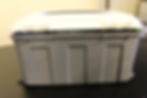
The value of 1 is clear. But let's discuss 2 a little more. Printing the part with the open face down will require a longer set-up period. This orientation is difficult tp print reliably. It also requires that the enclosure be printed with support material throughout. This results in a rough interior texture and more expense, due to the support material. There is also the risk of any interior bosses or features losing detail because they printed on support material. You can see a comparison of sections of the same part printed open side down and up in the photos below.


Printed "Belly-up" so interior features are cleanPrinted "Belly-down" so support material must be removed. Creating the rough interior.
Infill or Ribs
When a part is 3D printed there is the ability to either create a solid piece or reduce the density of thick areas of the part by using internal lattices. This "infill" reduces print time and material used and is highly recommended.
The infill makes the part behave like a sandwiched composite. So even though it uses less material it is structurally very strong at low infill percentages of less than 50%.
However if more structure is required we recommend adding ribs. These are simple to print and provide a large amount of strength. Using ribs with thin walled enclosures are ideal as they result in even less material used than infill and better control the structure of the enclosure.
Surface Finish
Since electrical enclosures are generally purely functional, they are often printed at the lowest resolution possible. The layering is visible, but it reduces lead time and has not structural downside. If a more refined surface is necessary the layering can be be made to nearly disappear with high resolution printing. The downside is that the printing time per part can go up as much as 300%. And the smooth surface can only be created on straight vertical surfaces. Any sort of incline or vertical curve will make the layering more visible. All of this is well defined in the part below, where it was printed with high resolution.


Reduce Rims and Overhangs
It is very common to create a rim around the top of an enclosure or case. This improves rigidity for a lid or for ejection from a mold. These rims often protrude some distance horizontally from the part with little filleting below them. This is done to reduce material used, but that is unnecessary for 3D printing (infill eliminates excess material from thick areas).
These rims in fact increase the cost and difficulty in manufacturing the part with 3D printing, because they must be supported. In the case of the part above an entire secondary structure of support material from the base of the case to the rim must be built simply to support the rim in the last 0.25 inches of the part. This adds a great amount of print time and material, therefore increasing the cost of the part. The way to avoid this is simple to add a chamfer of fillet underneath the rim, so that it seems to gradually protrude from the case as it is grown layer by layer. Examples of this filleting are shown below.

In this particular case, the enclosure actually has an overhang angle of 90 degrees, thus requiring support. If a 45 degree chamber was adding it would greatly reduce the cost of the part.
Final Notes
Hopefully these pointers will help you when working on your next enclosure. When working with Slant 3D one of our engineers is always available to help you through the process. And when you submit a design for quotation we will always be willing to make recommendations in order to reduce cost. 3D Printing is a very viable manufacturing option for electrical enclosures. But to use the process effectively you must design for it. Pressing an part designed for injection molding into a 3D printer will never created an injection molded part. Better to design a part for 3D printing.